How to Set a Volleyball Correctly (11-Step Guide)
The setter holds one of the most important positions on the court.
Not only do they take the majority of sets and second hits, they’re also expected to function as one of the on-court leaders.
While there are many intangible qualities to look for in a great setter, the most important aspect of a setter is the ability to provide great sets to the team’s attackers.
It’s vital that a setter learns how to set a volleyball with good technique to ensure consistent and reliable sets for their teammates.
Use these 11 steps to deliver consistent sets and help your attackers rack up the kills.

How to Set a Volleyball Correctly:
Step #1 - Read the Defence
One major key to a quality set is finding a player that will have an easy time killing the ball.
Further on in this step-by-step, I’ll share advice on choosing your target.
Reading the defense before the play begins is step one because it allows you to get an idea of what options you may have as the play develops.
Stay aware of what the defense is doing as much as possible.
Step #2 - Be Athletic
The setter has one goal:
Provide a quality set.
Standing around like a “bump on a log” until the ball magically appears in your hands is not the way to be a successful setter.
Remember to remain athletic in serve receive and as you approach your setting position.
Step #3 - Get There With Urgency
Once the pass has been made, it’s time to get to a good setting position.
The goal will be to have the pass come down just in front of the top of your forehead.
Get to that position as quickly as possible so you have ample time to go through the remaining steps required for how to set a volleyball.
Step #4 - Finalize Your Target
Now that you know where the pass is coming from, it’s time to decide where you want the ball to go.
This decision should be made as you’re approaching your spot, not as you begin to set.
Decide who to set based on where your hitters are and where the blockers are. This is the moment where you can show that you have been paying attention to the defense.
You can also decide that there are no good options for quality hits, so you should dink or dump the ball over the net rather than set.
Knowing where you’re heading with the ball allows you to get yourself in the best position to give a good set.
Step #5 - Square to Your Target
Once you’ve selected a target, it’s time to get your lower body aligned with your upper body square with your target.
Having to twist or lean while setting will diminish accuracy and power.
Your feet, knees, and hips should be facing where you want to set the ball.
Alternatively, if you intend to back set, your feet, knees, and hips should be facing directly away from where you want to set the ball.
Step #6 - Arms Up, Elbows Out
Proper arm placement has your arms up and elbows out to the side.
Again, being prepared is key when practicing how to set a volleyball.
Don’t wait until the ball is almost to your hands to get yourself into these proper positions.
Have your arms up and elbows out as soon as you get to your spot. This will allow you to make small adjustments quickly as the ball approaches.
With that said, don’t run to your spot with your arms up as this will slow you down significantly.
Get to the spot, then get your arms up.
Step #7 - Hands Ready
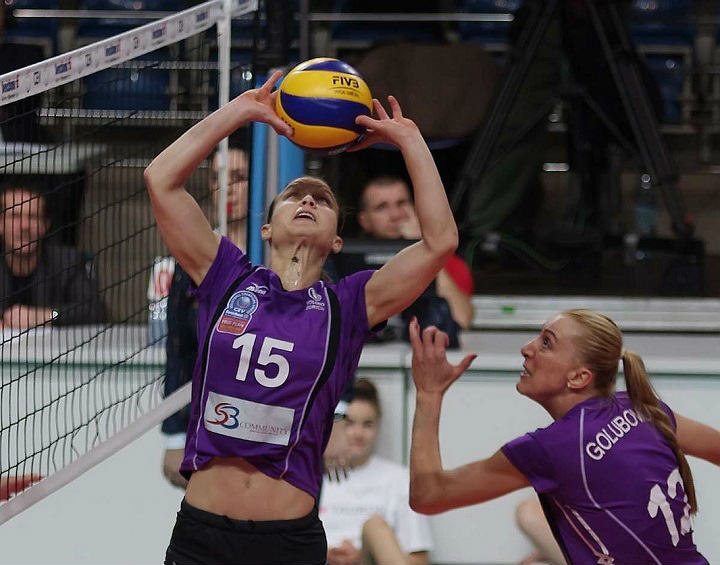
Hand position is obviously one of the most important technical aspects for a setter.
Hands should be over the forehead, mimicking catching the ball over your head. And your fingers should be relaxed as if someone were about to place the ball into your hands.
Your thumbs and forefingers should make a triangular window that you can look through and see the ball approaching.
Hand position is identical whether you are setting forward, up, or a backset.
Step #8 – Set Your Feet
Your feet should already be square to your target at this point.
But if they’re not, now is the time to ensure you’re totally square and positioned properly.
Feet should be shoulder width apart which allows you solid support for your set.
The foot closest to the net should be moved slightly forward in front of the courtside foot which will turn your hips and shoulders slightly, helping to prevent pushing the ball over the net on your sets.
Step #9 - Set Your Base
Setting is not supposed to be all hands and arms.
Forgetting to utilize your legs and core through the set will lead to weak, short sets.
Having a strong base is essential to getting the ball where you want it to go and on time. With that said, make sure your base is prepared athletically.
Knees should be bent slightly with your weight slightly forward on the balls of your feet.
This puts you in position to support your set and to quickly change position if something goes awry during the play.
Step #10 - Receive the Ball and Push
Contact is possibly the hardest part of setting.
The well-drilled setter can contact the ball with all ten fingers which gives full control of the set.
It’s important to make sure the fingers touch the ball identically on both hands. This will prevent dreaded spin on the ball which typically results in being called for a double contact foul.
As soon as you feel the ball touching your fingers, push it.
This is where you can utilize your leg bend to help you push the ball to your target.
Your arms and legs should straighten up at the same time as your entire body pushes the ball toward the target.
Step #11 - Push Through the Ball
Once the push has started, don’t stop it until your arms are completely straight.
And once the ball begins to leave your hands, you should be straightening your wrists.
The follow through of the hands and wrists allows the ball to continue towards your target.
The ideal finishing position is straight legs, straight arms, and hands up with the palms facing your target.

Three Differences When Back Setting
Back setting is utilized to set a player behind you without having to turn completely around 180-degrees and being able to do this makes you a far more effective setter.
You’ll be able to set the person behind you without letting the defense know until the ball is already headed towards the hitter.
Most of the process is the same, however, there are a few subtle changes to remember...
a. The Knee Bend
It’s not as important to get the strong knee bend on a backset.
Rather than focusing on the knees, ensure your hips are slightly forward with a slight arch in your back.
This will give you some leverage to thrust the ball behind you.
b. The Push
Again, there is minimal leg push needed on a backset as the momentum doesn’t generate as much force.
A good backset receives the ball very slightly farther back above your head with the follow through going behind and straight out.
The follow through and ending position should be the same…
Just behind your head, straight legs, straight arms back, and straights wrists with extended fingers.
c. The Finish
If back setting, or really setting any unusual set, you should turn to face your target once the set has left your hands.
This allows your teammates to be aware of where the ball is heading and get into appropriate coverage positions.
It also allows you to be prepared to cover a blocked ball coming back over the net.
Conclusion
Setting is arguably the toughest job on the volleyball court.
With the variety of intangibles required, all the things to remember, and the technical requirements, it can be challenging for any athlete to excel at the setting position.
Being a high-quality setter requires practice and repetition of all steps on every set.
Soon, these eleven steps will become burned into your muscle memory and you’ll see improvement in your sets!

